 You're viewing an older version of Polymer.
Please see
You're viewing an older version of Polymer.
Please see The starter-kit includes 3 placeholder pages you can use to start building out
the views of your application. But at some point, you'll probably want to add more.
This step takes you through the process of adding a new page or top-level view to your application.
Create an element for the new page
First, create a new custom element that encapsulates the contents of your new view.
-
Create a new file called
src/my-new-view.htmland open it in an editor. -
Add some scaffolding for a new custom element definition using Polymer:
<link rel="import" href="../bower_components/polymer/polymer.html">

<dom-module id="my-new-view">
  <!-- Defines the element's style and local DOM -->
  <template>
    <style>
      :host {
        display: block;

        padding: 16px;
      }
    </style>

    <h1>New view</h1>
  </template>
  <!-- Creates the element's prototype and registers it -->
  <script>
    Polymer({
      is: 'my-new-view'
    });
  </script>
</dom-module>
For now your element is very basic, and just has a <h1> that says "New View",
but we can return to it and make it more interesting later.
Add the element to your app
-
Open
src/my-app.htmlin a text editor. -
Find the set of existing pages inside the
<iron-pages>:<iron-pages selected="[[page]]" attr-for-selected="name" fallback-selection="view404" role="main"> <my-view1 name="view1"></my-view1> <my-view2 name="view2"></my-view2> <my-view3 name="view3"></my-view3> <my-view404 name="view404"></my-view404> </iron-pages>The
<iron-pages>is bound to thepagevariable that changes with the route, and selects the active page while hiding the others. -
Add your new page inside the iron-pages:
<my-new-view name="new-view"></my-new-view>Your
<iron-pages>should now look like this:<iron-pages selected="[[page]]" attr-for-selected="name" fallback-selection="view404" role="main"> <my-view1 name="view1"></my-view1> <my-view2 name="view2"></my-view2> <my-view3 name="view3"></my-view3> <my-new-view name="new-view"></my-new-view> <my-view404 name="view404"></my-view404> </iron-pages>Note: Normally when adding a new custom element for the first time, you'd want to add an HTML Import to ensure the component definition has been loaded. However, this app template is already set up to lazy-load top level views on-demand based on the route, so in this case you don't need to add an import for your new
<my-new-view>element.The following code that came with the app template will ensure the definition for each page has been loaded when the route changes. As you can see, we followed a simple convention (
'my-' + page + '.html') importing the definition for each route, and you can adapt this code as you like to handle more complex routing and lazy loading.Existing template code—you do not need to add this
_pageChanged: function(page) {
  // Load page import on demand. Show 404 page if fails
  var resolvedPageUrl = this.resolveUrl('my-' + page + '.html');
  this.importHref(resolvedPageUrl, null, this._showPage404, true);
},
Create a navigation menu item
Last, we'll add a menu item in the left-hand drawer to allow navigating to your new page.
-
Keep
src/my-app.htmlopen in your editor. -
Find the navigation menu inside the
<app-drawer>element.<!-- Drawer content --> <app-drawer> <app-toolbar>Menu</app-toolbar> <iron-selector selected="[[page]]" attr-for-selected="name" class="drawer-list" role="navigation"> <a name="view1" href="/view1">View One</a> <a name="view2" href="/view2">View Two</a> <a name="view3" href="/view3">View Three</a> </iron-selector> </app-drawer>Each navigation menu item consists of an anchor element (
<a>) styled with CSS. -
Add the following new navigation item to the bottom of the menu.
<a name="new-view" href="/new-view">New View</a>Your menu should now look like the following:
...
<!-- Drawer content -->
<app-drawer>
  <app-toolbar>Menu</app-toolbar>
  <iron-selector selected="[[page]]" attr-for-selected="name" class="drawer-list" role="navigation">
    <a name="view1" href="/view1">View One</a>
    <a name="view2" href="/view2">View Two</a>
    <a name="view3" href="/view3">View Three</a>
    <a name="new-view" href="/new-view">New View</a>
  </iron-selector>
</app-drawer>
...
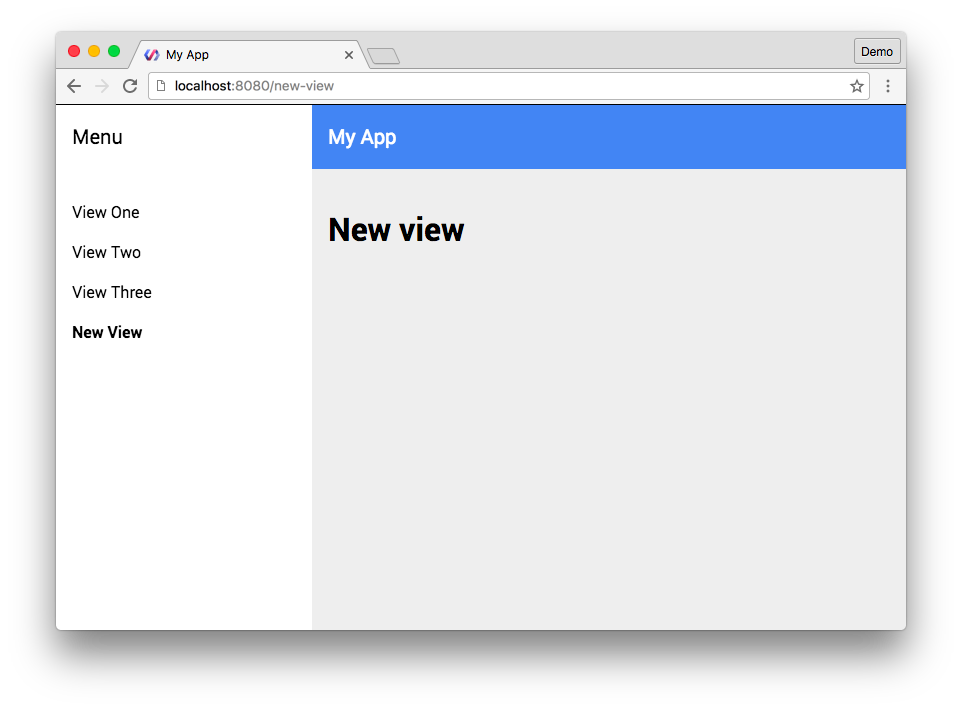
Your new page is now ready! Open your web browser and view it at http://localhost:8080/new-view.
Register the page for the build
When you deploy your application to the web, you'll use the Polymer CLI to prepare your files for deployment. Polymer CLI will need to know about any demand-loaded fragments like the lazy-loaded view you just added.
-
Open
polymer.jsonin a text editor. -
Add
src/my-new-view.htmlto the list offragments.The new list should look like this:
"fragments": [
  "src/my-view1.html",
  "src/my-view2.html",
  "src/my-view3.html",
  "src/my-new-view.html",
  "src/my-view404.html"
]
Note: You only need to add files you will lazy load or import using the async
attribute to the fragments list. Any files that are imported using synchronous
<link rel="import"> tags should not be added to fragments.
Next steps
Now that you've added a new page to your application, learn how to add 3rd-party elements to your application, or how to deploy the app to the web.